Young, sugary wort, freshly finished boiling is like an attractive woman in a hot outfit at a night club. On the other hand, wild yeasts, bacteria, molds, and other contaminates are like every sex deprived man, marinated in alcohol, and basted with cologne and desperation out looking for a good time. Your job as brewer is to be your wort's 'big, fat, friend.' Control the surroundings, keep intruders at bay, and get your girl home safe.
One of the most vulnerable times for wort is after the boil. Wort must be cooled down from boiling temperatures to yeast pitching temperatures as quickly as possible. The longer it takes wort to chill the more opportunity for contamination. On my first two batches of beer I used the poor man's method of chilling wort: put the covered boiling kettle in a bath of ice water and wait it out. For 2.5 to 3 gallons of wort this took me about 30-45 minutes. I'd heard of immersion chillers and decided to try and make my own with amazing results. **Spoiler Alert!!** I used my homemade wort chiller on the next patch of beer and was able to cool the boiling liquid down from 208 F to 75 F in about 15 minutes. Here's how I made my wort chiller.
First, you need to go to the hardware store. You will need to get the following items:
- 20-25 feet of 3/8" O.D. (outside diameter) copper tubing
- enough 3/8" I.D. (inside diameter) vinyl tubing to go from your sink to your kettle and back again with some extra. I purchased 20'
- 2 hose clamps adjustable from at least 3/8" to a little larger then the O.D. of your vinyl hose
- faucet adapter to change the threading on your faucet end to garden hose threads. More on this later.
- 1/2" female garden hose repair kit.
I got all of this material from The Home Depot for under $50.
I started by wrapping the copper tubing around a coffee can with a circumference about a third smaller then my boiling pot. I left about 1.5' to 2' extra on each end.
Next, I removed the coffee can and carefully bent the longer of the two ends up through the center of the coil. Take time bending the copper and try to use hard objects (ex. soup cans) to bend around. If you think you are kinking the copper, stop and try making your bend in another place. Don't kink the copper because you will run the risk of developing a hole in the tubing which will contaminate your wort. Here's a hint, the tighter the bend the greater the chance of developing kinks.
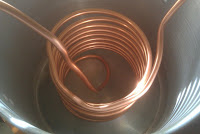
I bent the two ends of the coil into hooks to hang over the edge of the kettle. This way, if the connection with the vinyl hose ever fails the leak won't contaminate the wort.
Cut the vinyl hose in half and attach to the chiller with hose clamps. The chiller has to ends: the supply, and the return. In order to utilize convection currents created within the wort, I made the supply end the top of the coil and the return the bottom. This way the coldest water circulating through the chiller is at the top of the kettle. As the cooled wort moves to the bottom of the kettle, warmer wort will take it's place at the top next to the coldest part of the chiller. Method to the madness.

The hose repair end goes on the supply side of the vinyl hose. The smallest hose repair kit I could find was for a 1/2" hose. Since the I.D. of the vinyl hose is 3/8" it was a tight fit. Heating up the vinyl hose with hot tap water helped a bit. Finally you have to adapt the faucet you will use for cold water to accept the garden hose threaded end. This will depend on your faucet. If you have questions as to what you need, unscrew the aerator (small cap on the end of the faucet) and take it with you to the hardware store. Ask for help adapting your particular faucet to accept garden hose threads. Be careful to not lose any parts from your faucet's aerator or you will need to get parts for that as well.
Once everything has gone together, set the chiller in your empty kettle, attach the supply to the faucet, place the return in the sink, weigh it down by placing something heavy on the end of the hose, and turn the water on. Water should be flowing through the chiller and you can now check for leaks. If everything is snugged down you should be golden. Make sure to clean the chiller before and after each use and to sanitize it by placing it in the still boiling wort 15 minutes prior to the end of the boil. Monitor your chiller while it is in the wort and keep the vinyl hose away from the heat of the cook-top or you will be replacing it. When you start water flowing through the chiller, keep in mind that the water coming out of the return end will be hot until the wort cools down. Don't burn yourself!
There you go, a fun do-it-yourself project all in the name of beer.


No comments:
Post a Comment